| Anatomy of a Base |
 |
|
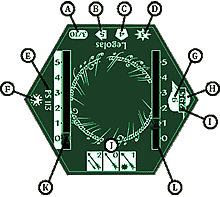
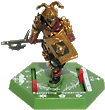
The Lord of the Rings(TM) Tradeable Minitures Game features two types of warriors: heroes and minions. Heroes have dark green bases, while minions have light green bases. All of the warrior’s game information is printed right on the base.
If the warrior is capable of a ranged attack, there will be an oval with 2 numbers here. These numbers represent how many dice the warrior rolls when shooting and how far the warrior can shoot.
How fast the warrior moves across the map.
How hard it is to damage the warrior.
How many dice the warrior rolls in combat.
This number has no effect on game play, it is just there to help you organize your collection. The two letters before the number tell you what set the model is from.
Some models are harder to find than others.
 = common = common
 = uncommon = uncommon
 = rare = rare
 ultra-rare ultra-rare
 = promo = promo
If the model is unique, there will be a number here.
The leaf represents the forces of Good, while the crow represents Sauron’s forces of Evil.
How many points this model costs towards your total.
The special skills the warrior has, if any.
In addition to the static attributes listed above, you will find a slider on each side of the warrior’s base.
White Slider Starter Exclusive
Orange Slider Level 1 figure
Red Slider Level 2 figure
Purple Slider Level 3 figure
Blue Slider Level 4 figure
How much damage a warrior can take before it is killed. When a warrior is out of wounds, it is removed from the map. The wounds slider has a white bar with green numbers.
How many Action Points (APs) the warrior can use during a battle. The warrior needs these to pay for certain abilities. APs do not get replenished during the game, so use them wisely. The action point slider uses white numbers.
|
This article will give you a brief rundown on how the game plays. For more details information, you can download the entire rulebook in .pdf format here
.
The Game Turn

There are 4 phases in every turn.
Each turn starts with the Strategy phase, where players roll to determine who is the attacker and who is the defender for that turn. The player that rolls the highest can choose to be either.
The next phase is the attacker’s action phase. In this phase, each of the attacker’s warriors can take one action. A warrior can move, shoot or do nothing as its action. Once the attacker is finished with all of his or her actions, the defender now gets their action phase.
The final phase is the combat phase. This is when your warriors fight. Warriors killed in this phase aren’t removed until the very end, so they will at least get to fight back if they are struck down.
Movement
The hex map makes movement very easy. Your warrior gets a number of movement points (MP’s) equal to its move stat.
It costs 1 MP to cross a clear line. Red lines represent difficult terrain, and cost 2 MP’s to cross. The most prohibitive terrain type is water, represented by blue lines. These lines cost 3 MP’s to cross. Black lines are impassable, and can never be crossed.
When you move a warrior, it can move in any direction, regardless of which way it was facing, and end its move facing any direction. You can move through hexes containing friendly warriors, but not through enemies. Finally, if you move into an enemy Kill Zone then that warrior must stop moving.
 A warriors kill zone consists of the three hexes in front of it, as indicated by the gray hexes in diagram A. Impassable terrain can limit the size of a kill zone, as shown in diagram B. A warriors kill zone consists of the three hexes in front of it, as indicated by the gray hexes in diagram A. Impassable terrain can limit the size of a kill zone, as shown in diagram B. |
Shooting
If a warrior is capable of a ranged attack, it will have an oval on the front of its base, with two numbers on it. The first number is how many dice you throw when that warrior shoots. The second number tells you how far the warrior can shoot.
To shoot with a warrior, choose a single target. You cannot shoot through models (friend or foe) and the number of hexes between your shooting warrior and the target (including the target’s hex) must be equal to or less than your shooter’s range.
The Shooting attack is resolved in two rolls: First you roll to see if you hit, and if you hit you will roll to see how much damage you caused.
Roll a number of dice equal to your warrior’s shots. Each die that scores a 5 or 6 is a hit. If you rolled any 1’s, your warrior can spend 1 action point to convert a 1 to a 6.
Pick up a die for each hit you rolled, and roll them. Each die that rolls equal to or greater than the target’s toughness takes 1 wound from that warrior. If you rolled any 1’s, your shooting warrior can spend 2 action points to convert a 1 to a 6. If the target is reduced to zero wounds, it is removed from the map.
Combat

In the combat phase, you resolve any combats that are on the map. A combat is a single group of engaged warriors. Each player adds up the attacks of their engaged warriors. An engaged warrior is one that has an enemy in its kill zone. Just like shooting, combats are resolved in two rolls: the combat roll and the damage roll.
Roll 1 die for each attack you added up earlier. Each 4, 5 or 6 you roll scores a hit. Your engaged warriors can spend action points to convert 1’s into 6’s at the cost of 1 action point per die converted.
Now roll a die for each hit you scored to see how much damage you caused. Each 1 you roll can be converted to a 6 at a cost of 2 action points from any of your engaged warriors.
Now you can assign your damage dice. Each damage die you assign to an enemy warrior takes 1 wound from it. You can only assign a damage die to a warrior if that die is equal to or greater than the enemy warrior’s toughness. Dice you can’t assign are ignored.
Once all damage dice have been assigned, warriors with zero wounds are removed from the map.
That’s the basics! There's a bit more, like elevated terrain and outflanking, and a host of special abilities. Check them out in the full rulebook here
.
|

